Brightness Control
Brightness Capabilities
The CAN Create software utilizes a special object found in the Display menu called Brightness. The object looks for an integer value on its input pin in the range from 0-100 which corresponds to the percentage dimming of the display backlight. It is important to understand that 0 will turn the backlight completely off. Unless extreme power savings are required 1% will result in a barely visible screen that can still be seen under low ambient lighting conditions.
Brightness Demo files:
Extract the .CCS file and .CIP file from the brightness-demo.zip. The images will need to be imported into your library if not already present by going to Tools->Open Image Library->Import Image Pack. Refreshing and Reloading the library should remove any red X boxes that show up in place of the buttons below. This demo was built on the 516CANDI 2.4″ display, but could be adapted to the 550MDI or 700MDI by changing the settings in the View->Design Properties menu. Before simulating the code (which can be found by going to View->Code Script) must be compiled. To check that the memory value is actually being stored the simulator must be refreshed by going to Simulator->Reset Simulator which emulates power cycling the actual hardware.
Brightness Demo Screenshot:
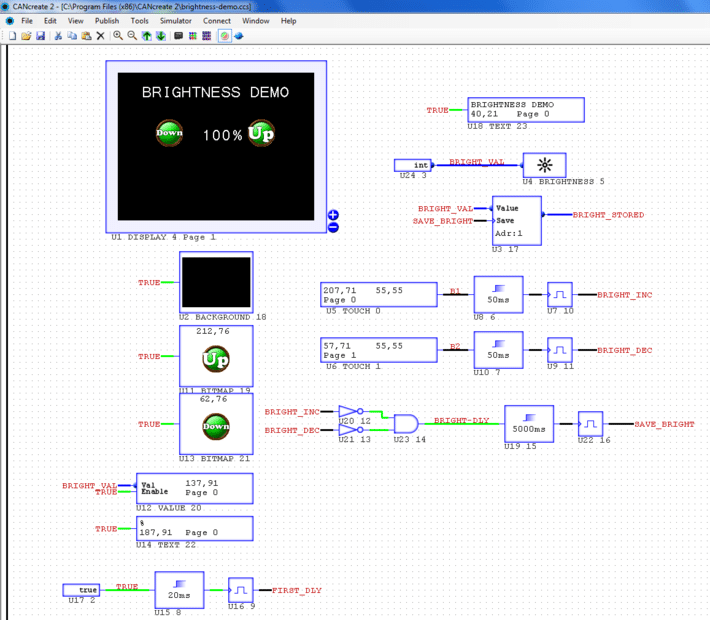
The brightness demo covers several basic concepts. It uses a Memory object to store the current brightness level to a file which can then be read back in on start up. It also uses the parallel C-scripting to determine the value of the brightness. This allows more complex behaviors that could utilize fewer set points or by pressing and holding the button it could jump to full scale or off. It also provides the mechanism to bound the value between the 1-100 value the Brightness object is expecting.
int BRIGHT_VAL;    //Global brightness value var

void Init()
{
}    //end Init

void Update()    //Begin Update loop
{
    if (FIRST_DLY)    //load memory values from schematic input
    {
        BRIGHT_VAL = BRIGHT_STORED;
        if(BRIGHT_VAL == 0)    //Check to see if stored value 0
        {
            BRIGHT_VAL = 100;    //Set to full brightness if no previous stored value
        }
    }

    if (BRIGHT_INC && BRIGHT_VAL < 10)    //Increment Brightness command based on touch input
    {
        BRIGHT_VAL++;    //change brightness by 1
    }
    else if (BRIGHT_INC && BRIGHT_VAL >= 10 && BRIGHT_VAL <= 95)
    {
        BRIGHT_VAL += 5;    //change brightness by 5
    }
    else if (BRIGHT_INC && BRIGHT_VAL > 95)
    {
        BRIGHT_VAL = 100;    //clamp brightness at 100
    }    //end Increment command

    if(BRIGHT_DEC && BRIGHT_VAL <= 10 && BRIGHT_VAL > 1) //Decrement Brightness command based on touch input
    {
        BRIGHT_VAL--;    //change brightness by 1
    }
    else if (BRIGHT_DEC && BRIGHT_VAL > 10)
    {
        BRIGHT_VAL -= 5;    //change brightness by 5
    }
    else if (BRIGHT_DEC && BRIGHT_VAL <= 1)
    {
        BRIGHT_VAL = 1;    //clamp brightness at 1
    }    //end Decrement command

}    //end Update loop
The first thing that happens is the stored value of BRIGHT_VAL is loaded after a small initial delay to allow the memory object in the logic portion time to read and update the BRIGHT_STORED value. A check is made that if the stored value is 0 it forces the brightness to be 100%. This is primarily due to the fact that the first time a design is loaded the MEMORY.DAT file on the micro SD Card does not have any saved data and will initialize to 0. After using the Up/Down buttons to adjust the brightness and allowing the 5 second inactivity timeout to save the new updated value it will then load the last saved value on startup.
The BRIGHT_INC and BRIGHT_DEC inputs to the code are from the touch region objects centered on the Up/Down graphics. The code checks to see which is pressed and what the current value of the brightness is to determine how much the value should be incremented.
In general the brightness of the LED backlight will not behave in a linear fashion. The difference between 95% and 100% is barely detectable. Once the value gets down below 10% each percentage change has a noticeable impact. The code in the demo accounts for this and modifies the value in 5% increments above 10% and only 1% increments below 10%.
After adjusting the brightness levels the logic portion is used to determine if a 5 second period of inactivity (neither of the up/down buttons are being pressed) occurs which then pulses the save pin of the memory object updating the stored value on the micro SD card.